DIY Plans
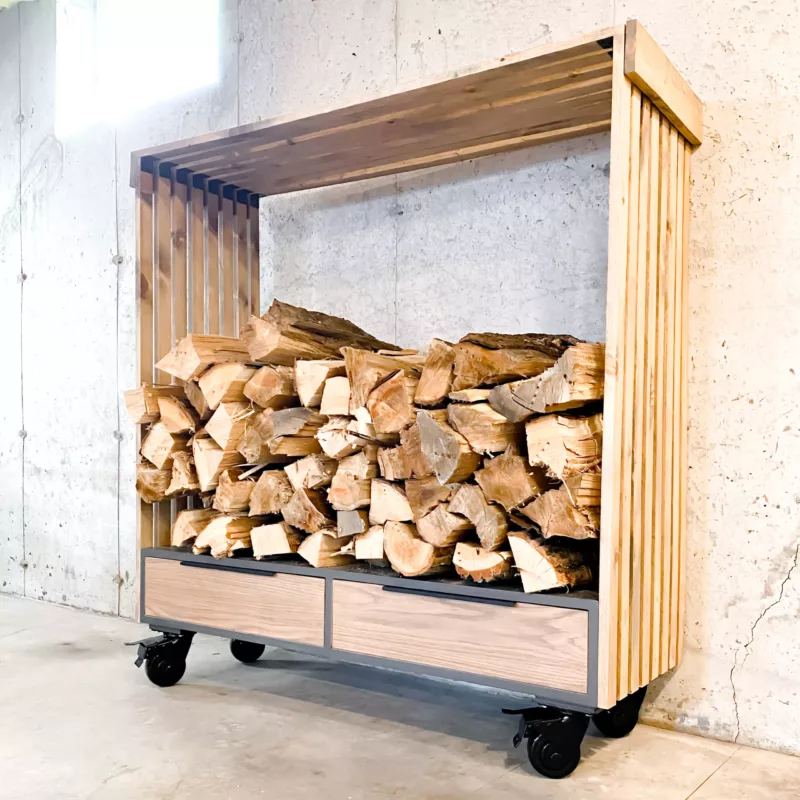
Rolling Firewood Rack With Storage
You can also view these plans online at https://thehappyglamper.co/plans/rolling-firewood-rack-with-storage/
Use password 3657 to unlock the content.
Project
Room
Cost
Skill Level
Dear Fellow Woodworker,
Thank you so much for choosing my plans! If you encounter any hiccups or have questions, don't hesitate to reach out. I'm here to make your building experience as smooth as possible. Your suggestions for improvement or sharing your finished project would be fantastic—I'd love to showcase it on my social media!
Best of luck,

Let's Begin
Helpful tips: Always work on a clean level surface, free of imperfections or debris. Always use straight boards. Check for square after each step. Always pre-drill holes before attaching with screws. Use glue with finish nails for a stronger hold. Wipe excess glue off bare wood for stained projects, as dried glue will not take stain. Be safe, have fun, and ask for help if you need it. Good luck!
Tools/Supplies Required
Get the perfect build with these carefully curated tools and supplies! Don’t worry if you don’t have a certain item, click the link below to get what you need quickly.
Material List
| Item | Quantity | Link | |
|---|---|---|---|
| 3/4″ x 4′ x 8′ Sanded Plywood | 1 | Buy Here | |
| 1/2″ x 4′ x 8′ Sanded Plywood | 1 | Buy Here | |
| 1″ x 2″ x 8′ Pine | 16 | Buy Here | |
| 3/4″ Edge Banding | 25 ft | Buy Here | |
| 1 1/4″ Pocket Screws | 1 pack | Buy Here | |
| #6 1″ Screws | 1 pack | Buy Here | |
| #6 5/8″ Wood Screw | 1 pack | Buy Here | |
| #6 1/2″ Screws | 1 pack | Buy Here | |
| 1 1/4″ 16 Gauge Brad Nails | 1 pack | Buy Here | |
| 1 1/4″ 18 Gauge Brad Nails | 1 pack | Buy Here | |
| 1/2″ 18 Gauge Brad Nails | 1 pack | Buy Here | |
| 10″ Drawer Pulls | 2 | Buy Here | |
| 15″ Blum Drawer Slides | 2 pair | Buy Here | |
| Angle Bracket | 16 | Buy Here | |
| Caster Wheels | 4 | Buy Here | |
| 1/4″ x 1″ Hex Lag Screw | 16 | Buy Here | |
| 1/4″ Washers | 16 | Buy Here | |
| 3/8″ Wood Plugs | 1 pack | Buy Here |
Cut List
| Item | Description | Qauntity | |
|---|---|---|---|
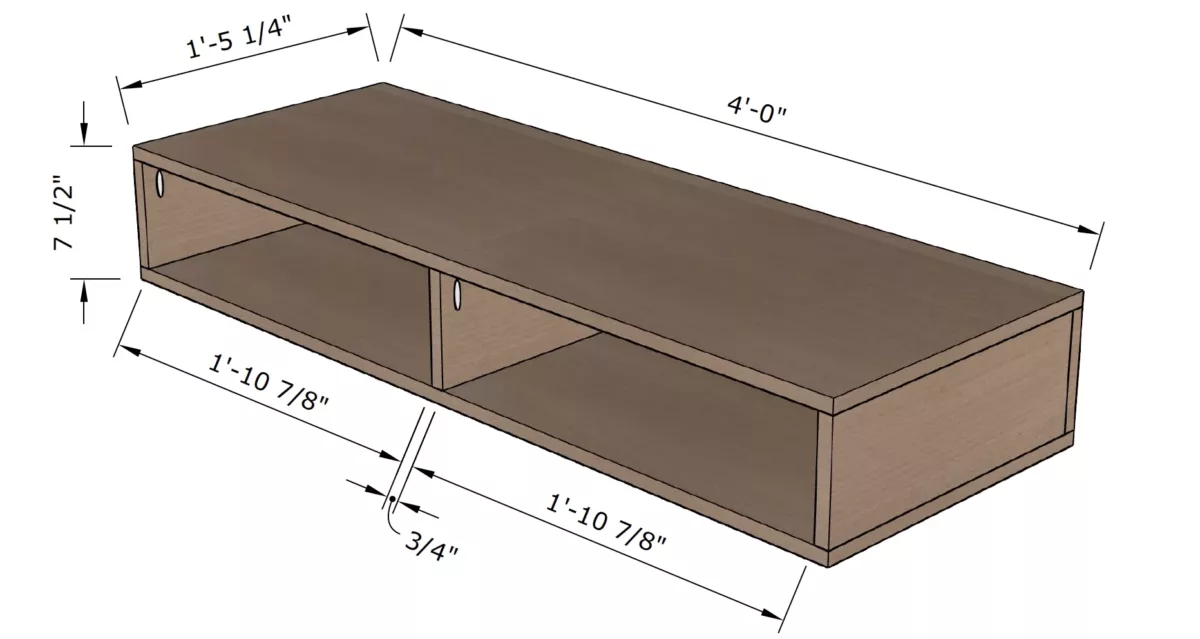
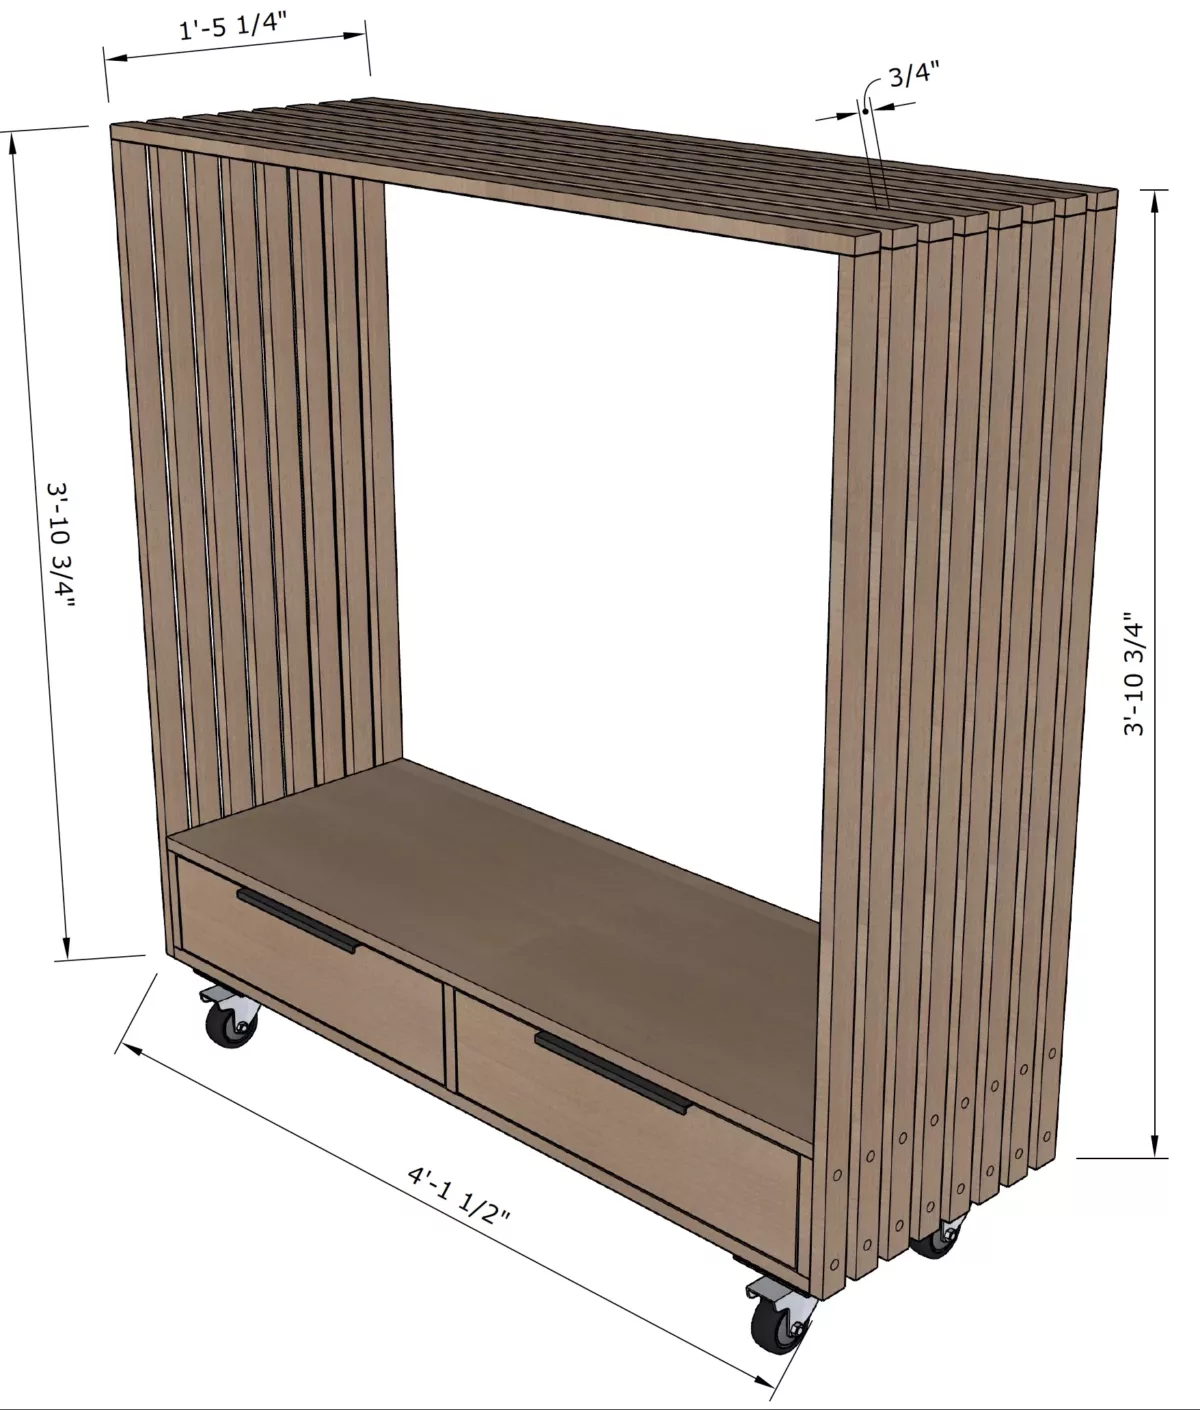
| 3/4″ x 16 1/2″ x 6″ | Cabinet Box Sides | 3 | |
| 3/4″ x 48″ x 6″ | Cabinet Box Back | 1 | |
| 3/4″ x 17 1/4″ x 48″ | Cabinet Box Top/Bottom | 2 | |
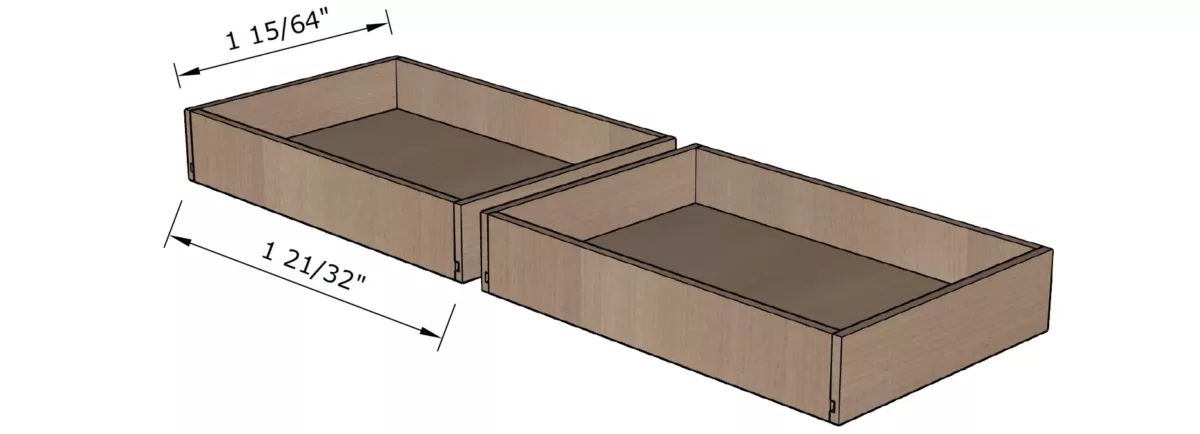
| 1/2″ x 15″ x 4″ | Drawer Box Sides | 4 | |
| 1/2″ x 21 1/4″ x 4″ | Drawer Box Front/Back | 4 | |
| 1/2″ x 14 3/8″ x 21 5/8″ | Drawer Box Bottom | 2 | |
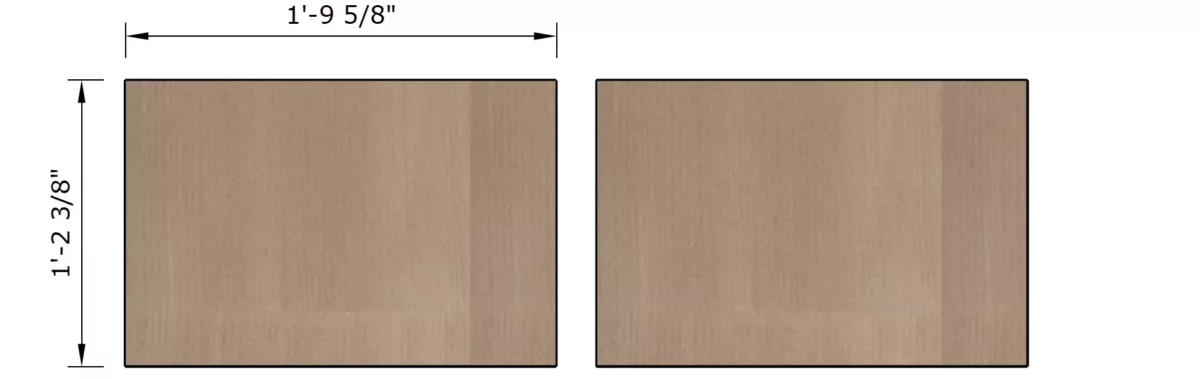
| 3/4″ x 22 5/8″ x 5 3/4″ | Drawer Front | 2 | |
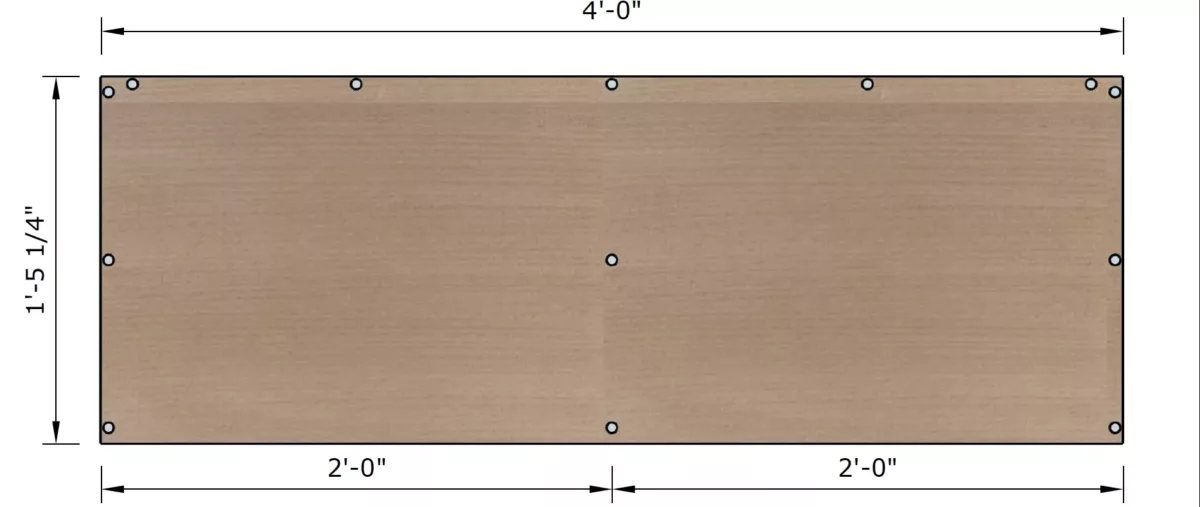
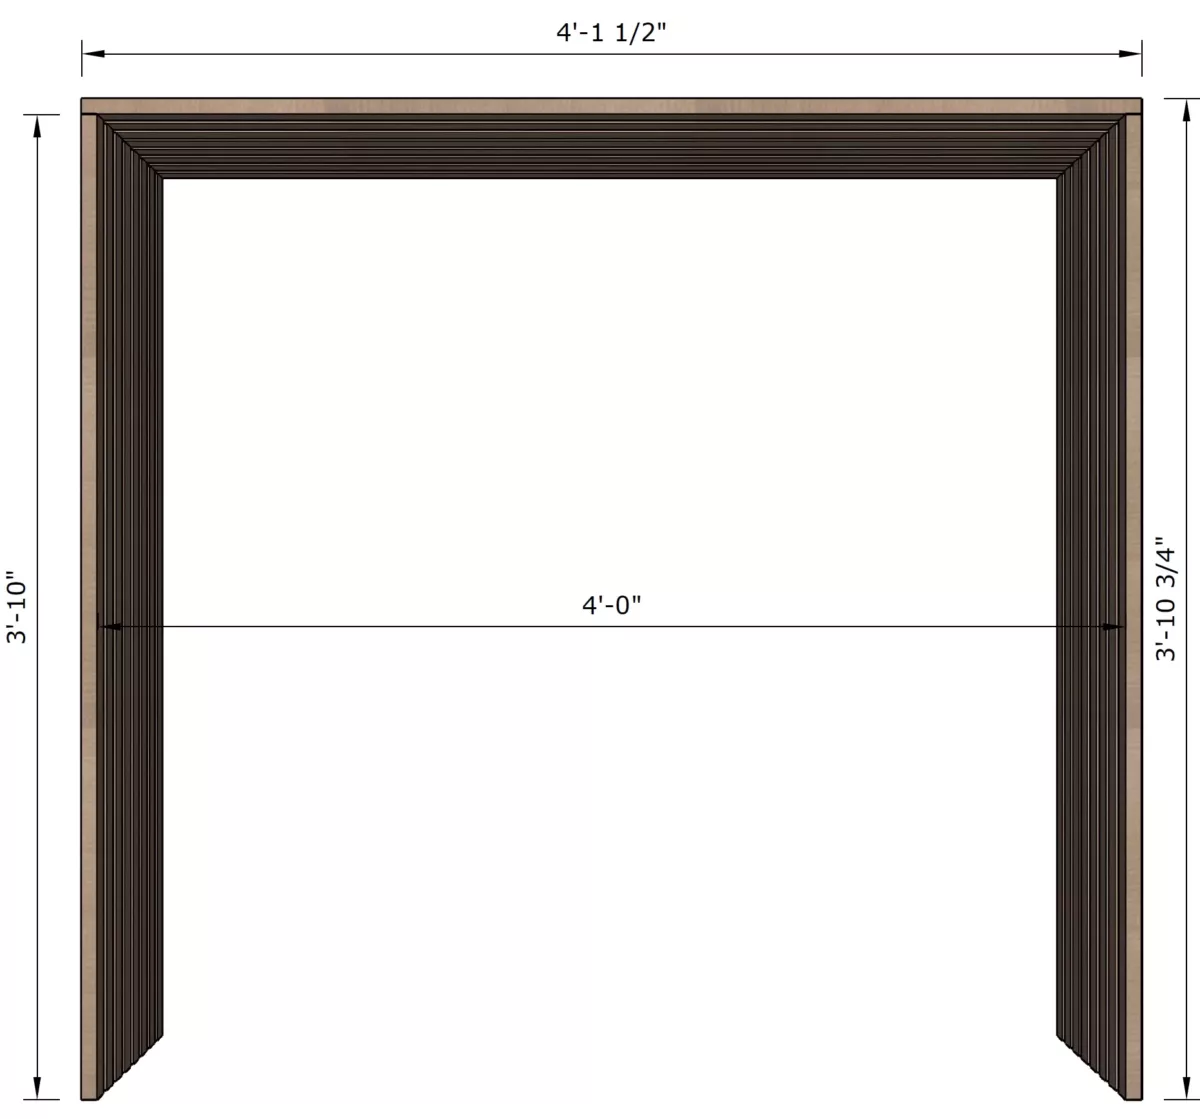
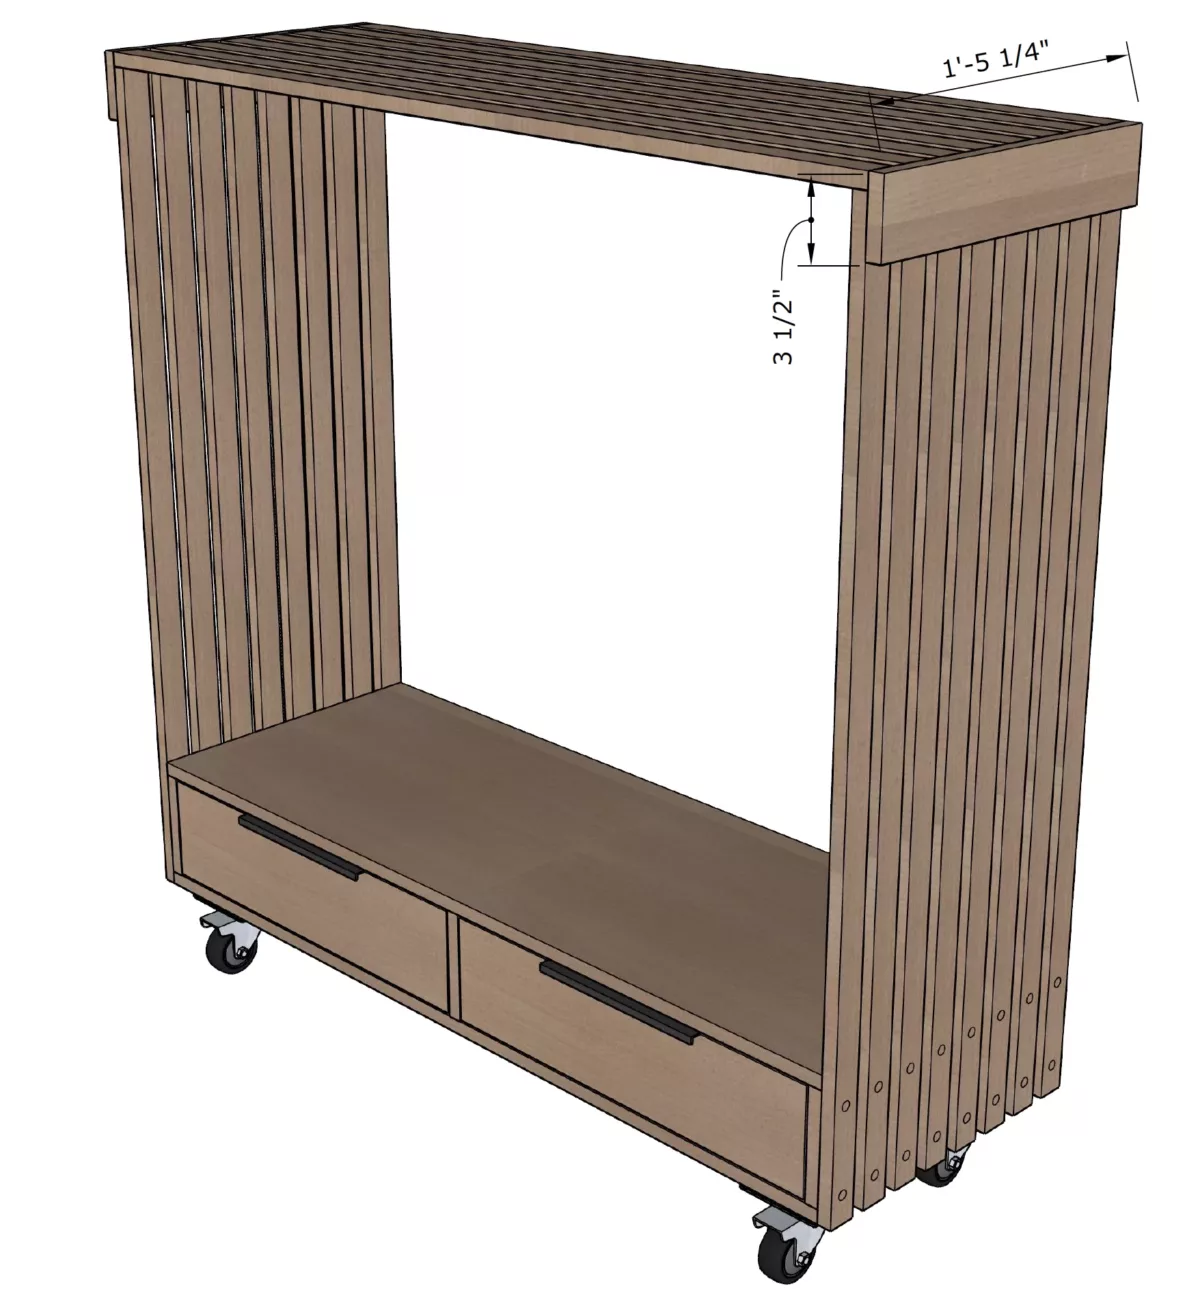
| 3/4″ x 1 1/2″ x 49 1/2″ | Slat Top | 8 | |
| 3/4″ x 1 1/2″ x 46″ | Slat Side | 16 | |
| 3/4″ x 3 1/2″ x 17 1/4″ | Slat Support | 2 | |
| 3/4″ x 4 1/2″ x 15 3/4″ | Wheel Supports | 2 |
Instructions
1
Step
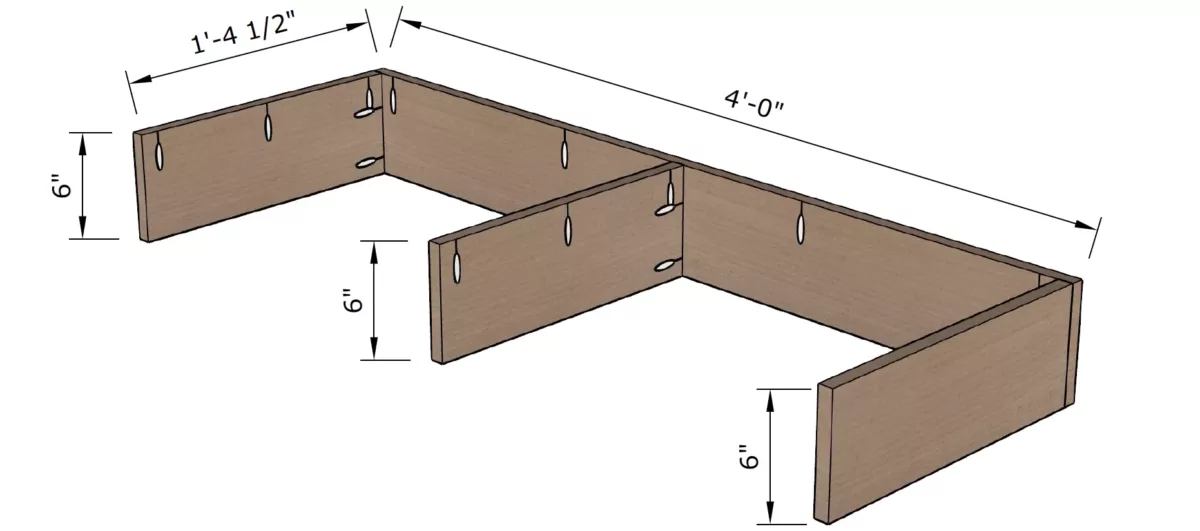
Build the Cabinet Box
- Using the Kreg rip-cut circular saw guide or a table saw, cut the 3/4″ plywood to the specified dimensions in the cut list. Ensure all your cuts are square.
- With a Kreg pocket hole jig, drill pocket holes as follows:
- 3 holes along the **top edge** of each Cabinet Box Side
- 2 holes along the **back edge** of each Cabinet Box Side
- 4 holes along the **top edge** of the Cabinet Box Back
(Refer to the diagram below for visual placement.)
- Apply wood glue to the edges where the pieces will join. Then, attach the Cabinet Box Sides to the Cabinet Box Back using 1 1/4″ pocket screws. Make sure the pieces form clean, tight corners as you assemble.
- Next, apply wood glue to the top edges of the assembled sides and back. Attach the Cabinet Box Top using the same 1 1/4″ pocket screws. Double-check that everything is aligned and square before tightening the screws fully.
- Flip the box upside down so you can install the bottom panel. Use a Kreg Countersink Bit to pre-drill shallow holes (about 1/4″ deep) into the Cabinet Box Bottom. Apply wood glue, then attach the bottom with 1 1/4″ screws. Tip: Drill 3/8″ in from the edge, and keep your drill perfectly vertical to avoid the screws coming out the side.

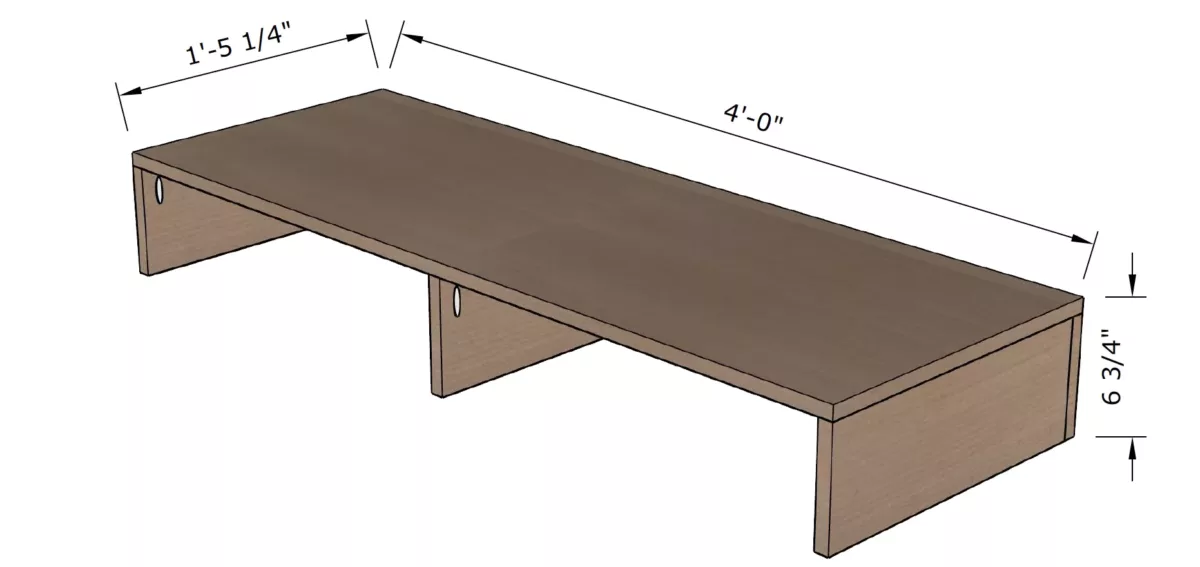
(View)
Bottom
2
Step
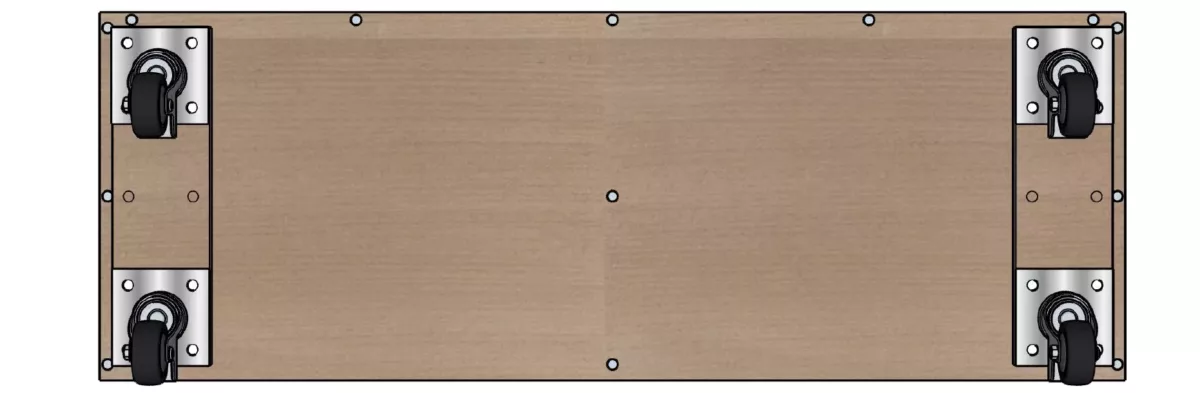
Add the Wheels
-
- Cut the Wheel Supports from the 3/4″ plywood according to the dimensions listed in the cut list.
- On the bottom of the Drawer Box, measure in 3/4″ from each side where the Wheel Supports will be mounted. Position the supports and secure each one using six 1 1/4″ screws.
Important: Make sure your screw placement won’t interfere with where the wheel base plates will be attached. - Place the caster wheels on top of the supports and align them. Using a 5/32″ drill bit, pre-drill holes through the mounting holes in the base plates.
- Attach the wheels to the supports using 1/4″ washers and 1″ lag screws. Tighten each lag screw securely using a 7/16″ socket or wrench.
(View)
Bottom

(View)
Bottom
3
Step
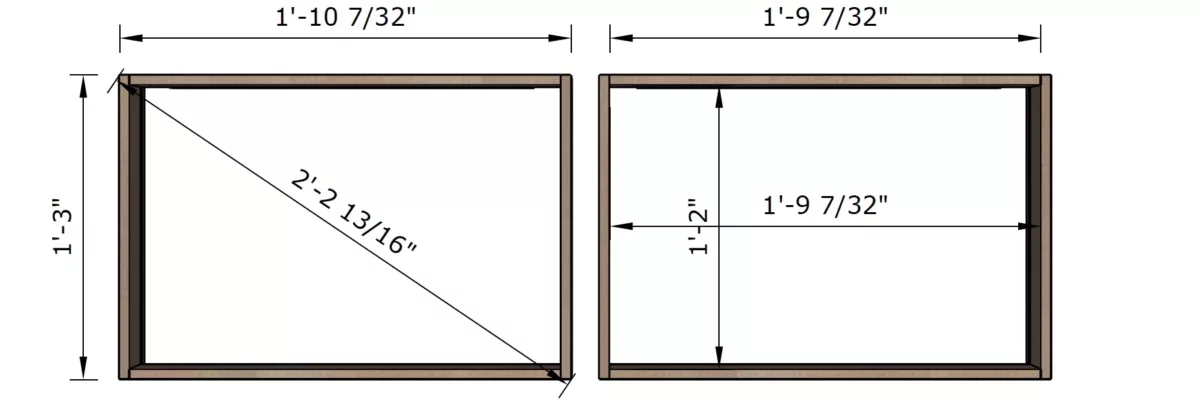
Build the Drawer Box
- Using a Kreg rip-cut circular saw guide or a table saw, cut the 1/2″ plywood to the dimensions specified in the cut list. Be sure all your cuts are square and accurate.
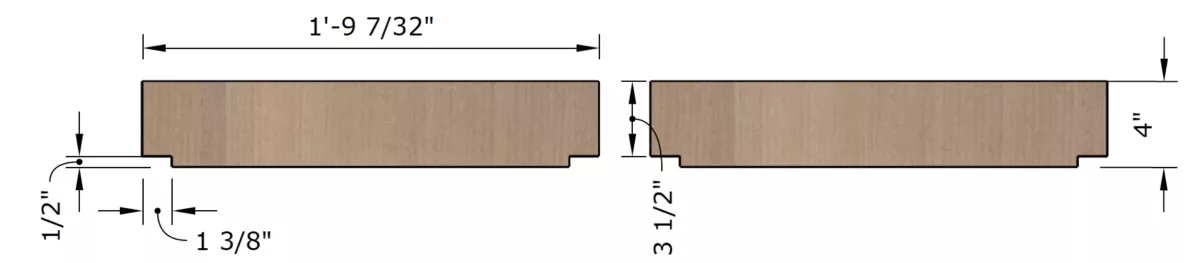
- Install a dado blade set on your table saw, then cut a 1/4″ deep by 1/2″ tall groove (dado) into each Drawer Box Side and Drawer Box Front/Back panel. This groove should start 1/2″ up from the bottom edge to allow clearance for the Blum locking device.
- Using a jigsaw, cut a 1 3/8″ x 1/2″ notch into the bottom edge of each Drawer Box Back panel—on the same side as the dado groove. This notch allows clearance for the Blum drawer slides to extend through the back of the box.
- To assemble, apply wood glue to the front edges of the Drawer Box Side panels and attach them to the Drawer Box Front panel. Secure with 1 1/4″ 18-gauge brad nails.
- Apply wood glue inside the dado grooves, then slide the Drawer Box Bottom panel into place.
- Apply wood glue to the back edges of the side panels, then attach the Drawer Box Back panel with 1 1/4″ 18-gauge brad nails.
- Check for square by measuring diagonally from corner to corner. If the measurements don’t match, use bar clamps to adjust the shape and hold it square while the glue dries.
- Repeat the entire process to build the second drawer box.

(View)
Top
(View)
Back

(View)
Back
(View)
Top
(View)
Front
4
Step
Add the Drawer Slides
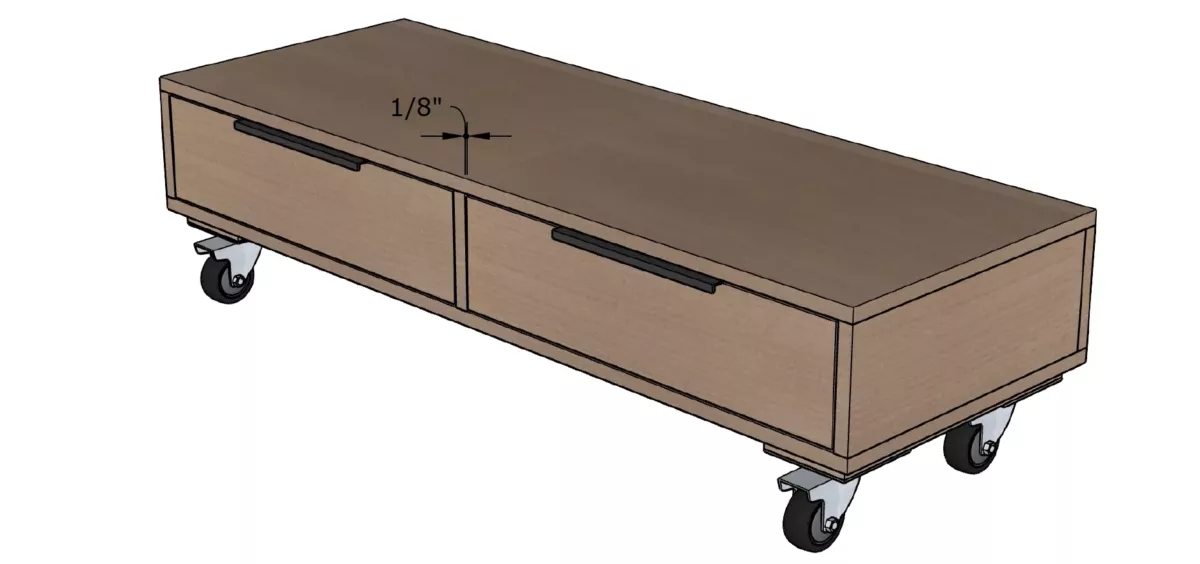
- Inset each Blum drawer slide by 1/8″ from the front edge and hold it in position. For accurate screw placement, use a self-centering drill bit to pre-drill the holes. This keeps the screws perfectly centered in the mounting holes, preventing misalignment or shifting.
- Secure each drawer slide using four 5/8″ wood screws. For additional details and diagrams, refer to the official Blum installation manual.
- Install the Blum locking devices at the front bottom corners of the drawer box using #6 1/2″ screws. For easier, more accurate installation, consider using the Blum boring template and specialty tools designed for this system.

5
Step
Add the Drawer Fronts
- Cut the Drawer Fronts to the dimensions specified in the cut list, then apply 3/4″ edge banding to the edges for a clean, finished look.
- Center each Drawer Front on its corresponding Drawer Box, using playing cards or 1/8″ spacers to maintain a consistent 1/8″ gap on all sides. Temporarily tack the front in place using two 1 1/4″ 18-gauge brad nails.
- Open the drawer and secure the Drawer Front permanently from the inside using 1″ screws. Adjust the position as needed before tightening to ensure even spacing and smooth drawer operation.
- Install your drawer pulls or knobs according to the hardware instructions.
- Double-check the drawer slides and make any final adjustments for smooth movement and proper alignment.
6
Step
Build and Assemble the Slats
- Cut the Slat Sides and Slat Top to the dimensions listed in the cut list.
- Apply wood glue to the ends of each Slat Side where they meet the Slat Top. Secure the joint with two 1 1/4″ brad nails to hold it in place temporarily.
- Reinforce each corner by attaching angle brackets to the inside of the assembled U-shape.
- Repeat this process to build a total of 8 U-shaped slat assemblies.
- Use a Kreg Countersink Bit to pre-drill holes where each slat will attach to the Drawer Box. (Refer to the illustration below for exact placement.)
- Space each slat 3/4″ apart, then attach them to the Drawer Box using 1 1/4″ screws.
(View)
Front
7
Step
Finishing Touches
-
- Apply 3/4″ edge banding to all exposed plywood edges. Use an edge banding trimmer to remove any excess, then sand the edges smooth. For a cleaner finish, run a screwdriver along the edge to close small gaps and slightly round over the corners.
- Fill all visible screw holes with 3/8″ wood plugs and patch any nail holes using wood filler. Once dry, sand everything flush and smooth.
- Lightly sand the entire surface of the bed frame using 220 grit sandpaper for a clean, even finish.
- If you’re staining the rack, apply a coat of pre-stain wood conditioner first. This helps prevent blotchiness and ensures an even color.
- Apply your chosen stain to achieve the desired color. The finish shown in the photos uses Classic Gray by Minwax.
- Once the stain is dry, seal the surface with a clear protective coat. We recommend General Finishes Polycrylic in satin for a smooth, durable finish.